Ads 468x60px

Thursday, 12 July 2012

Keyboard Shortcuts for Windows


Here are some of the useful keyboard shortcuts that are available  in Windows

  • Make all open windows transparent to view gadgets and icons on desktop
  • [Windows] + [Spacebar] 
  • Show or hide the desktop
  • [Windows] + [D] 
  • Minimize all but selected window (reverse by clicking the key combination again)
  • [Windows] + [Home] 
  • Dock selected window to the left (or) right half of your screen
  • [Windows] + left arrow (or) [Windows] + right arrow 
  • Maximize and restores the selected window
  • [Windows] + up arrow (or) [Windows] + down arrow 
  • Maximize and restores selected window in vertical dimension only
  • [Windows] + [SHIFT] + up arrow (or) [Windows] + [SHIFT] + down arrow
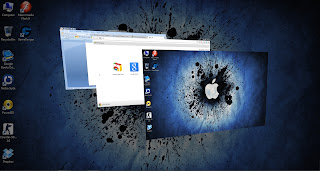
  • Launch 3D representation of open windows  
  • [Windows] + [Tab] (Press [Tab] key to flip through them)


Windows & Taskbar

  • Flip window
  • [Alt] + [Ctrl] + [Tag] + left/right/up/down arrow
  • Cycle through open windows
  • [Alt] + [Tab]
  • Move focus to front or back of taskbar
  • [Windows] + [T] (or) [Windows] + [SHIFT] + [T]  (Press [T] again while holding the [Windows] key to cycle through items in the taskbar from left to right or, with [SHIFT] button held too, from right to left)
  • Puts focus on the ‘show hidden icons’ button on the system tray
  • [Windows] + [B]
  • Launch icon on taskbar (including items pinned to taskbar)
  • [Windows] + [1] THROUGH [Windows] + [9]
  • Starts new instance of respective taskbar icon
  • [Windows] + [SHIFT] + [1] THROUGH [Windows] + [SHIFT] + [9]
  • Opens jump list for respective icon
  • [Windows] + [Alt] + [1] THROUGH [Windows] + [Alt] + [9]


Multiple Monitors

  • Move selected window from one monitor to another. They will remain in the same relative location
  • [Windows] + [SHIFT] + right arrow (or) [Windows] + [SHIFT] + left arrow
  • Select presentation display mode
  • [Windows] + [P]


Magnifier

  • Activates Windows Magnifier to zoom in or out of screen
  • [Windows] + [+] (or) [Windows] + [-]
  • Switch to docked mode
  • [Ctrl] + [Alt] + [D]
  • Switch to lense mode
  • [Ctrl] + [Alt] + [L]
  • Switch from docked or lens mode back to full screen mode
  • [Ctrl] + [Alt] + [F]
  • Invert colors
  • [Ctrl] + [Alt] + [I]
  • Exit magnifier views
  • [Windows] + [Esc]

Saturday, 19 May 2012

Free Cloud Storage : Dropbox vs GoogleDrive vs SkyDrive vs SugarSync


Google Drive:
      
      Google Drive comes with 5 GB of free storage . It also include an option to turn on OCR(Optical Character Recognition ) text scanning , which helps you to scan the images for text and make them searchable when you upload a image. In Google Drive you can add files by "Drag-and-Drop" method. Google Drive has a built-in editor feature . Google Drive is available for Windows, Mac, Android and iOS is still on progress. In Google Drive you can open up to 30 file right inside your browser.
GoogleDrive for PC
GoogleDrive for Mobile - Android only


Dropbox:

     Dropbox comes with 2 GB of free storage on sign-up and you get 500MB of free storage for every referrals up to 16GB. So you can extend up to 16 GB of free storage for free account. The strength of the app is it's API built on . The dropbox is the one of the most developer- friendly storage since it helps you to access your files everywhere. The files are secured with SSL AES 256- bit encryption. Dropbox offer 50 GB and 100GB of storage for $9.99 and $19.99 which is expensive when compared with other could storage's. You can add file by Drag-and-Drop method. Dropbox is available for iphone ,ipad, Android ,Backberry , Windows , Mac , Linux.
Dropbox for pc
Dropbox for Mobile


SkyDrive:


     SkyDrive comes with 7GB of free storage (Free upgrade of 25GB , if claimed on time). SkyDrive are very good at synchronizing when the documents are created using Microsoft Excel,Word , PowerPoint and OneNote. In SkyDrive you can share public links , view or edit public links. SkyDrive has a special feature known as "Skydrive's Fetch" in which if you forgot to synchronize something and if you home computer is turned-on , you can still access the files.SkyDrive is available for Windows ,Mac ,ipad ,iphone ,Windows Phone.
SkyDrive for Pc- you need to sign-in to get the app.
SkyDrive for Mobile


SugarSync:


     SugarSync comes with 5GB of free storage on sign-up and you get 500Mb of free storage for every referrals up to 32GB , So you can extend up to 32 GB on free storage for free account . SugarSync let you to pick folders all over the computer to synchronize, then let you to choose whether you want to synchronize  each folder to all the devices or to a particular device.You can password protect the file when you are sharing them . It is secured with SSL AES 128- bit encryption.SugarSync is available for Windows , Mac ,iphone,ipad,Android ,Windows Phone,Symbian ,Blackberry.
SugarSync for Windows
SugarSync for Mac
SugarSync for Mobile


Click the below link to view the comparison table:


Free Cloud Storage and Comparisons : Dropbox vs GoogleDrive vs SkyDrive vs SugarSync

Cloud Storage is a model of networked stored online where the information's are stored  in virtual space of storage that are hosted by third-parties. In this post we are going to see few cloud storage services GoogleDrive , Dropbox ,SkyDrive, SugarSync about their feature and are compared with one another.


GoogleDrive VS Dropbox VS SkyDrive VS SugarSync


Google Drive

DropBox

SkyDrive

SugarSync


Free Storage

5GB

2GB

(+ 0.5GB
per Referral up to 16 GB)


7 GB

(Free upgrade to 25GB.
If claimed on time)

5GB

(+0.5 GB per referral up to 32 GB)

Minimum Upgrade Price

25 GB at $2.49/Month

50 GB at $9.99/Month
(or)
$99/year


20 GB to your free storage at $10/year

30 GB at $4.99/month
(or)
$49.99/year


Monthly
Paid Space

25GB – $2.49
100GB – $4.99
200 GB – $9.99
400 GB – $19.99
1000GB – $49.99


50GB – $9.99
100GB – $19.99

20GB – $0.83
50GB – $2.08
100GB – $4.16

30GB – $4.99
60GB – $9.99
100GB – $14.99
250GB – $24.99
500GB – $39.99


File support

MS word ,Excel, PowerPoint, PDF
Photoshop, SVG ,
PostScript, XPS, ZIP, RAR, TIFF, Illustrator.


Photos , videos

MS word, Excel, PowerPoint, OneNote, Photos, Videos


Photos

Online File Manager


YES

YES

YES

YES

Desktop Access


Windows , Mac

Windows , Mac, Linux

Windows ,Mac

Windows ,Mac


Mobile Access

Android,
(ipad and iphone coming soon)

iphone ,
ipad,
Android , Blackberry

ipad ,
iphone ,
Windows Phone

iphone,
ipad,
Android ,
Windows Phone,
Symbian ,
Blackberry


Developer Tools


Yes

Yes

Yes

Yes

Share Folder


Yes

Yes

Yes

Yes


Shared Folders with permission and Password


Yes


No


No


Yes
Limitations

(i)File Size

(ii)Bandwidth


Unlimited

Unlimited


Unlimited

20 GB/day/File


2 GB

Unlimited


Unlimited

20 GB/day/File

Security


N/A

SSL AES-256 bit encryption

SSL

SSL AES-128bit encryption


To download/know more about the service click the link below:
Dropbox vs GoogleDrive vs SkyDrive vs SugarSync

Friday, 16 December 2011

[How To] Lock PC or Laptop after a wrong or incorrect Password

When you are away from your PC or Laptop your friends or stranger might try to use your PC or Laptop .If you have password protected it they may try to log-in by guessing the password. So here is a trick to lock PC or Laptop after few attempts so that they cannot use them for a while(i.e) After 3 attempts they cannot log-in for about 30 minutes.
How to lock PC or Laptop after a wrong or Incorrect password?
 1.Go to Start in Search box type Local Security Policy and Enter.

2.Under the Security Setting choose -> Account Policies  -> Account Lockout Policies.
3.In Account Lockout Policies , Select the Account Lockout Threshold .

4. Enter the Value .
(For example: 3 then select Apply )


5.Then the Suggested Value Changes box appears , Click Ok.

6.You can change the timing in the Account Lockout Duration which is in Account Lockout Policies.
7.Finally Click OK.
Now your Pc or Laptop will be locked for 30minutes after a wrong or incorrect password.

Friday, 11 November 2011

Google Plus Shortcuts


Here are some Google Plus Shortcuts.
  • Google Plus supports Drag and Drop,so you can share links,photos,videos by directly dropping them into Share box.
  • To mention someone in your or other comments use + or @ Symbol before writing their name.
  • Google Plus doesn't have private messages but you can share a post with only specific friends and don't forget to disable Reshare.
  • To get permalink of any post click on the time-stamp of that post.
  • Public and Private posts are differentiated  by colors Green = Public Blue = Limited to circles.
  • To Underline the text write the text in-between two  Underscores  ( _exapmle_  ) - example.
  • To make the text BOLD write the text in-between two Asterisk   ( *example* ) - example.
  • To Display the text with a Strickthrough write the text in-between two Negative sign  (-example-) - example .

    Keyboard Shortcuts
  • Space               =Scroll Down
  • Shift+Space    =Scroll up
  • J                       =Single Post Down Scroll
  • K                      =Single Post Up Scroll
  • Q                      =Jump to Chat
  • Return             =Start Comment

Tuesday, 8 November 2011

[How To]Make Portable Version Application

Cameyo is an application which is used for making Portable Version Application for any Software. The main use of Cameyo is to make portable application , so that they can used whenever required without any installation process. This application is a freeware.
How To Make Portable Version Application:
1.Go to Cameyo.com and Download it.
2.Install or Run the program.

3.Choose the Capture Installation option.
4.Now it starts recording the Installation process.
5.Then install the program for which you want to create a Portable Version
6.After Installation Choose the Install done Option.

7.After few minutes a portable version of your installed application will be displayed .
8.Go to Online.cameyo.com and  Creating an account (if you don't have) and Log-in.
9.Then Upload the file that you have created .
10.After a few minutes you will receive a mail from Cameyo with your portable version application.
11.Finally download it .
That's it now you can use this application whenever required without any application.

Saturday, 15 October 2011

Access Desktop Remotely Using Google Chrome


Chrome  Remote Desktop is an extension which is used for accessing the desktop remotely. This application works only in Google chrome browser. With this application you can share and access computer remotely.
How to use Chrome Remote Desktop?
1.Go to the link Chrome Remote Desktop.
2. Install the add-on.
3.Launch the application and choose Continue .
4.Log-in using your GMail ID.

(Choose Allow Access)
5.Select to get the access code.

6.To Enter the Access Code choose Access a Shared Computer.

Support : Windows, Mac,Linux.

NOTE:
*Both the user's must be online in order to share and access remotely.

Tuesday, 20 September 2011

Split or Join Files Using HJ-Split


HJ-Split is an excellent application for split and recombine archive file. For Instance if you want to send a file of 50MB through mail and if the limit is 10MB then you can use HJSPLIT you can split the files into 5 file and send them easily . If you have backup a file of about 10GB , you can split the file in to 2 or 3 and burn them into CD/DVD.
This is a portable software so no need of any installation.
This application is freeware. 
How to Split files?
  • Run the HJ-Split.exe file.
  • Then select the Split option.
  • In Input File box  select the file which you want to split.
  • Split the file according to your choice by entering the file size in Kbytes in the File Size Box.
  • Finally click start.
 How to Join Files ?
  • Run the HJ-Split.exe file.
  • Select join option.
  • In Input File box select the file which you want to join.
  •  Finally click start.
  • Now the file will be joined together.
SUPPORTS: Windows 7/XP/Vista , Linux.

NOTE:
*The file will be split with the number at the end of the file name (like 001,002,003).
* Make sure that you don't rename file , or else the file cannot be joined. 

To Download :
Windows : HJ-Split
Linux       : HJ-Split

Sunday, 4 September 2011

[How To]Find Keylogger On Your PC

What is Keylogger?
Keylogger is application which is used for tracing the keystrokes of the keyboard. With this application one can easily trace the activities in your the computer. This program is mainly used for monitoring the activities in the computer .

How to find Keylogger on your PC?
  • Start-> Run->type msconfig.
  • Go to Startup tab in the System Configuration window. You will see numerous programs which can be enable or disabled.
  • Disable all the programs , after that Turnoff the firewall and shut down the antivirus program.
  • Then again go to the msconfig window, if you see any program that are enable automatically then it is the keylogger application.
  • Remember the name of the program and location and remove it.
  • If you didn't find any program enabled in the msconfig window then you are free from Keylogger.
  • Finally turn on the firewall , antivirus and all the program that were disabled in the msconfig window.
  • Close all the program and restart the computer.
NOTE :
*The user's are at their own risk and are not responsible in case any malfunctions or errors.

Saturday, 3 September 2011

[How To]Backup Facebook Profile

How to backup Facebook profile?
  • Login using your Facebook Account.
  • Go to Account -> Account Setting.
  • Select Download a Copy below the Account Setting.
  •  Then select the Start My Archive .

  • Facebook starts gathering your profile information and wait for few minutes.

  • Finally the information will be sent to your Email (to email ID associated with account) .
  • Click the link that was sent to your Email ( Login if necessary ) and enter the Facebook password and select the Download Archive and download the file.
  • If you want to view the profile open the INDEX.HTML file.
Note: This file contains all your personal information so keep it secure.

Friday, 19 August 2011

Facebook Shortcuts (Chrome,Firefox,Internet Explorer)


Here are some Facebook Shortcuts :
1.Mozilla Firefox
  • Shift+Alt+1: View your News Feed
  • Shift+Alt+2: View your own Profile
  • Shift+Alt+3: View pop-up of friend requests
  • Shift+Alt+4: View pop-up of messages
  • Shift+Alt+5: View pop-up of notifications
  • Shift+Alt+6: View Account Settings
  • Shift+Alt+7: View Privacy Settings
  • Shift+Alt+8: View Facebook’s own profile
  • Shift+Alt+9: Read latest Terms of Service agreement.
  • Shift+Alt+0: Open Facebook Help Center
  • Shift+Alt+?: Search
  • Shift+Alt+m: Compose a new message
2.Google Chrome
  • Alt+1: View your News Feed
  • Alt+2: View your own Profile
  • Alt+3: View pop-up of friend requests
  • Alt+4: View pop-up of messages
  • Alt+5: View pop-up of notifications
  • Alt+6: View Account Settings
  • Alt+7: View Privacy Settings
  • Alt+8: View Facebook’s own profile
  • Alt+9: Read latest Terms of Service agreement.
  • Alt+?: Search
  • Alt+m: Compose a new message
 3.Internet Explorer
  • Alt+1: View your News Feed
  • Alt+2: View your own Profile
  • Alt+3: View pop-up of friend requests
  • Alt+4: View pop-up of messages
  • Alt+5: View pop-up of notifications
  • Alt+6: View Account Settings
  • Alt+7: View Privacy Settings
  • Alt+8: View Facebook’s own profile
  • Alt+9: Read latest Terms of Service agreement.
  • Alt+?: Search
  • Alt+m: Compose a new message
*In Internet Explorer after each shortcuts , you have to press ENTER Key .

[How To] Search By Image in Google

Do you know that you can search by an image in Google?Here is the trick .


How to search by image ?
1.Install the Add-on which is given below.
2.Go to Google Images and do any of the following:

  • Drag & Drop : Drag & drop the file in the G-Search box which you want search.
  • Copy Image URL : If you have URL of an image , click on the camera icon in the G-Search box and paste the link new popup box.
  • By Right-Click : Right click the image and select Search by image Option.
  • Upload Image: Click the camera icon and choose Upload Image.

Mozilla Firefox: Search By Image
Google Chrome: Search By Image

Saturday, 6 August 2011

[How To]Place Facebook Chat At Sidebar In Firefox

Facebook is one of the most popular social network in the world of internet . Most of us like Facebook because of its chat option and smiley. But the chat option is found at the right side of the page which is not welcomed by most of the users and to chat with friends you need to sign-in every time. So here is trick to keep the Facebook chat separately without visiting the Facebook.com ; similar to that of Gtalk(i.e) The Facebook chat will be available in each and every tab while browsing as shown below


How to Setup Facebook Chat at sidebar:
1.Go to Bookmark Dialogue Box by selecting Ctrl+Shift+B.
2.Choose Organize -> New Bookmark and type the Name and in the Location bar type the folllowing:
"http://www.facebook.com/presence/popout.php"

3.Make sure that you check the Load this Bookmark in the sidebar and click Add.
4.To display the chat bar first go to View ->Sidebar ->Bookmark and select the Name that you have created .
For example :
In the above image the bookmark is named as Facebook chat. 


(*In Firefox 6 the View option is enabled by select Alt )


About Me

My Photo
surya
Currently doing BSc.Information Technology in P.S.G CAS
View my complete profile